Sonoff MINI R2
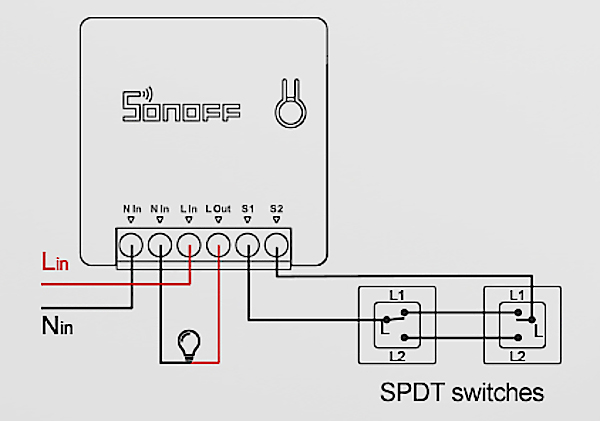
Example circuit diagram
Prerequisits
- Computer connected the the same network as your WiFi Accesspoint
- Second WiFi device (e.g. Android-Phone) to connect the the sonoff WiFi (AP Mode)
Enable DIY Mode
- connect the L~in~ and N~in~ wire
- turn on the power
- hold the button for 10 seconds and release
- the blue WiFi LED should blink 2x fast and 1x slow
- again, hold the button for 10 seconds and release
- the blue WiFi LED should blink perpetually fast
- with the second device:
- watch out and connect to a WiFi network like
ITEAD-xxxxxxxxxx - the password is:
12345678 - in the browser go to:
http://10.10.7.1 - click on
WIFI SETTING - enter your actual WiFi network credentials
- click on
Save
- watch out and connect to a WiFi network like
Flash Tasmota
Find IP with nmap
- the command looks like this (replace with your subnet):
nmap -sP 200.150.100.0/24 - look out for a new device (run the command once before and after the sonoff device entered the network)
- save the IP in an environment variable:
SONOFF_IP=200.150.100.160
Prepare OTA
URL Server: http://sonoff-ota.aelius.com
URL Image Lite: http://sonoff-ota.aelius.com/tasmota-latest-lite.bin
Visit the Server Website and obtain the SHA256 Hash for the tasmota-latest-lite.bin image.
RESTful API with curl
Check if the device operates in DIY Mode with a simple info request
curl -XPOST --header "Content-Type: application/json" --data-raw '{"deviceid": "", "data": {}}' http://$SONOFF_IP:8081/zeroconf/info
The OTA needs to be unlocked before flashing.
curl -XPOST --header "Content-Type: application/json" --data-raw '{"deviceid": "", "data": {}}' http://$SONOFF_IP:8081/zeroconf/ota_unlock
Now the tasmota firmware can be flashed. (Replace the sha256sum with the currently valid one)
curl -XPOST --header "Content-Type: application/json" --data-raw '{"deviceid": "", "data": { "downloadUrl": "http://sonoff-ota.aelius.com/tasmota-latest-lite.bin", "sha256sum": "5c1aecd2a19a49ae1bec0c863f69b83ef40812145c8392eebe5fd2677a6250cc" } }' http://$SONOFF_IP:8081/zeroconf/ota_flash
Configure Tasmota
The newly falshed tasmota device will start in AP (Access Point) Mode.
Connect the device to your WiFi network
Use a phone to connect to the tasmota WiFi network with a name like tasmota_xxxxxx-xxxx. It is not protected and does not require a password.
An android phone will prompt a sign in message. By selecting the notification the brwoser will redirect to the initial configuration web page. To access the page manually visit http://192.168.2.1.
Insert the target WiFi network credentials that the device should connect to and click Save. After a few seconds, the new assigned IP address within the target network should be displayed.
Configure Hardware
- open the configuration web site of the device
- go to
Configuration - go to
Configure Template- Name:
Sonoff MINIR2 - Based on:
Sonoff Basic (1) - GPIO0:
Button 1 - GPIO1:
User - GPIO2:
User - GPIO3:
User - GPIO4:
Switch 1 - GPIO5:
None - GPIO9:
None - GPIO10:
None - GPIO12:
Relay 1 - GPIO13:
Led_i 1 - GPIO14:
None - GPIO15:
None - GPIO16:
None - GPIO17:
None
- Name:
Configure MQTT
- open the configuration web site of the device
- go to
Configuration - go to
Configure MQTT- enter your mqtt credentials
- save
- go to
Configuration - go to
Configure Other- select
MQTT enable - enter device/friendly Name
- select
- save
Save/Backup Configuration
It is very useful to have a backup of the configuration. This will also speed up your configuration process if setting up multiple devices.
- open the configuration web site of the device
- go to
Configuration - go to
Backup Configuration - save the file
To restore the configuration (on another device).
- open the configuration web site of the device
- go to
Configuration - go to
Restore Configuration - select the saved configuration file
- click on
Start restore